Triggering Serverless Zeit Now on Postgres Events with Hasura
TL;DR
Build a 3factor app with Hasura’s instant realtime GraphQL and leverage serverless deployments of Now 2.0 for deploying GraphQL APIs and webhooks. Read more about building 3factor apps with event-driven programming.
In this post, we will look at building a 3factor app which leverages Hasura for the real-time GraphQL layer and Now 2.0 for the serverless deployments. The app is a simple demo featuring a
- GraphQL API to fetch profile information
- An external API providing weather information, extending Hasura API (deployed to Now)
- A serverless function which is a utility to reverse the name of the profile.
Before we deep dive into building an app with GraphQL and Serverless, let’s quickly look into what a 3factor app is, and why serverless could be beneficial.
3factor App
3factor is an architecture pattern for modern full stack apps. The architecture of a 3factor app is composed of
- Realtime GraphQL
- Reliable Event System
- Async serverless
With these, we can build apps with high feature velocity and scalability. In short, a 3factor app dictates removing state from your code, and storing it in your datastore and/or event queue as much as possible.
Why Serverless
Serverless is an exciting functional paradigm. It helps minimize backend ops with lesser maintenance. Business logic can be written as smaller independent functions with automatic failover. Microservices can be deployed as these independent stateless functions.
It also helps you scale by being cost efficient. Effectively you pay for usage rather than reserved time. It covers the use case of Async events. Serverless platforms like Now take care of the runtime. With Now, it has become easier than ever to deploy serverless functions and build rich experiences.
Hasura GraphQL + Now
Let us build the demo app to see the benefits of having a serverless architecture.
Realtime GraphQL on Postgres
Hasura gives you instant realtime GraphQL on Postgres. It runs as a container that you can host next to your database provider. Both Hasura and the Postgres database can be hosted on production-ready cloud providers like AWS. For simplicity of this demo, we are going to deploy Hasura GraphQL Engine on Heroku.
We are going to build this demo the 3factor way.
Quickstart with Heroku
1. Click on the link below to deploy to Heroku. (You can sign up for free)
2. Head to https://<YOUR_HEROKU_APP>.herokuapp.com and open your app. You should see the Hasura console.
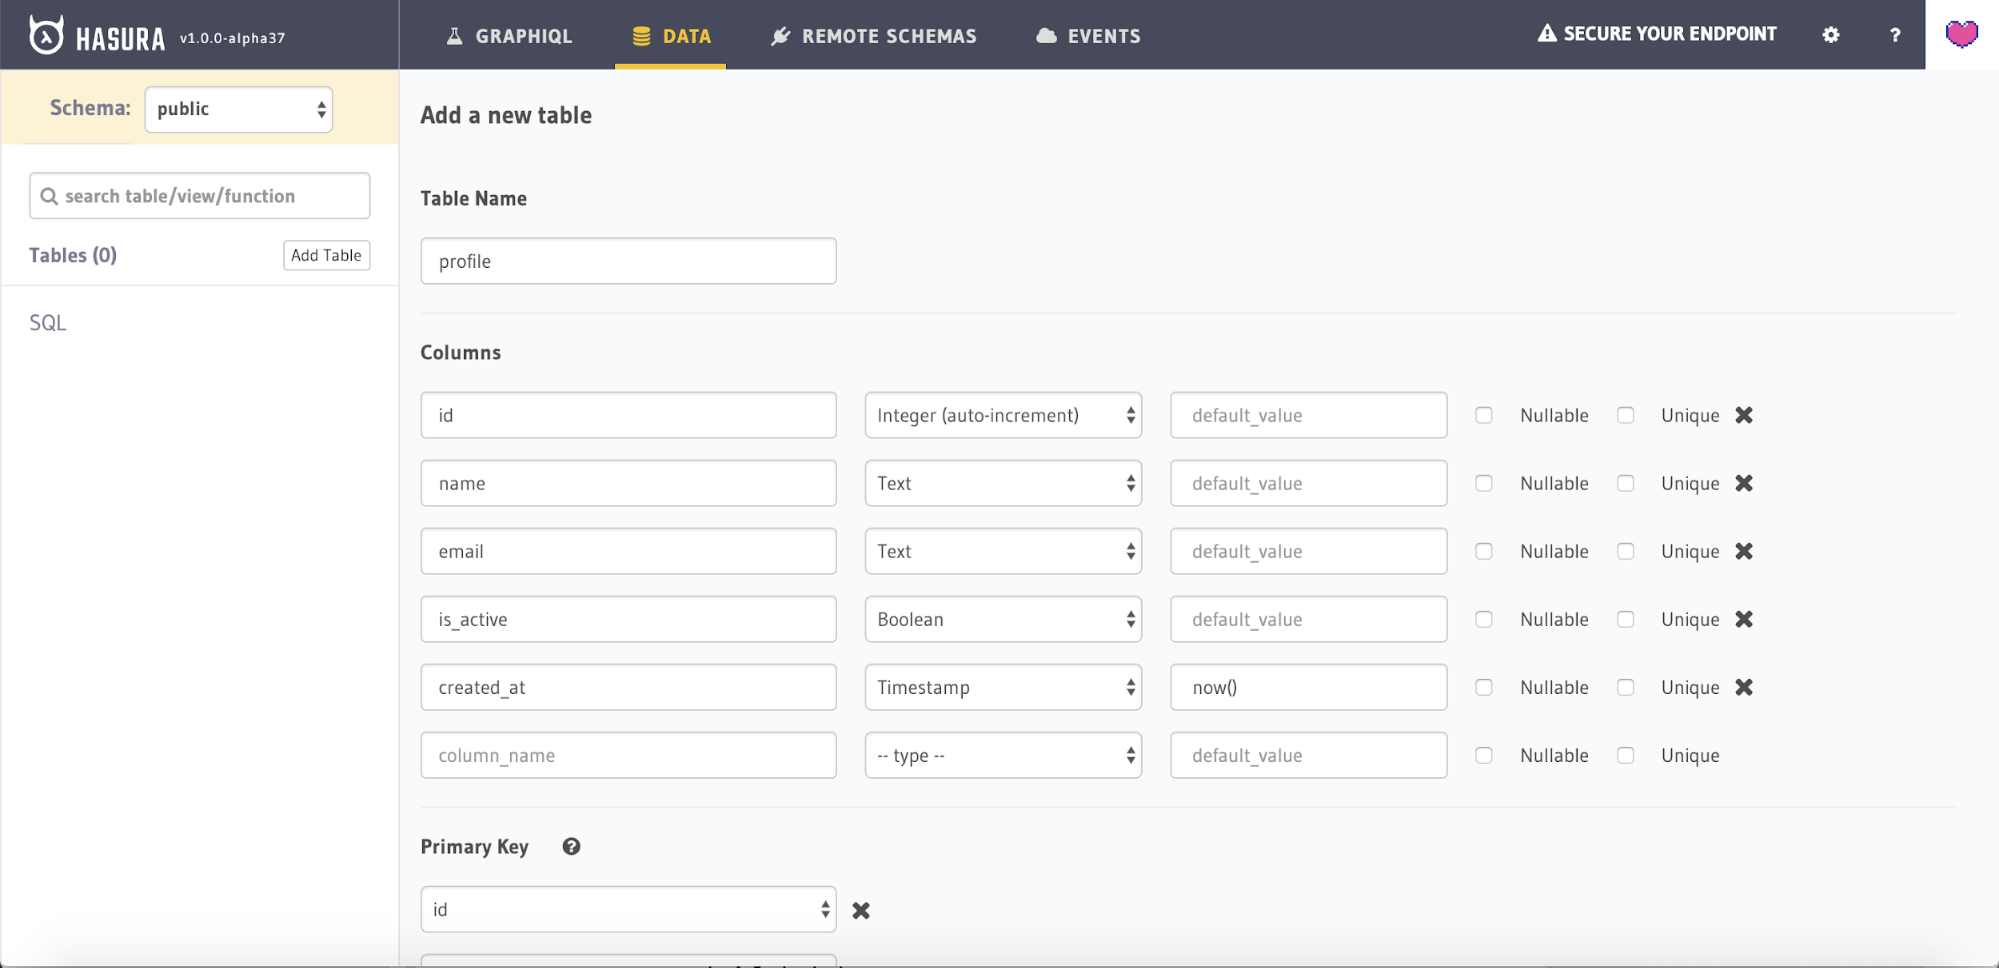
3. Now let’s create a table called profile. Head to Data->Create Table and enter the following details to create a profile table. It will have the following columns: id, name, email , is_active, created_at. Select id as the primary key and click on Create.
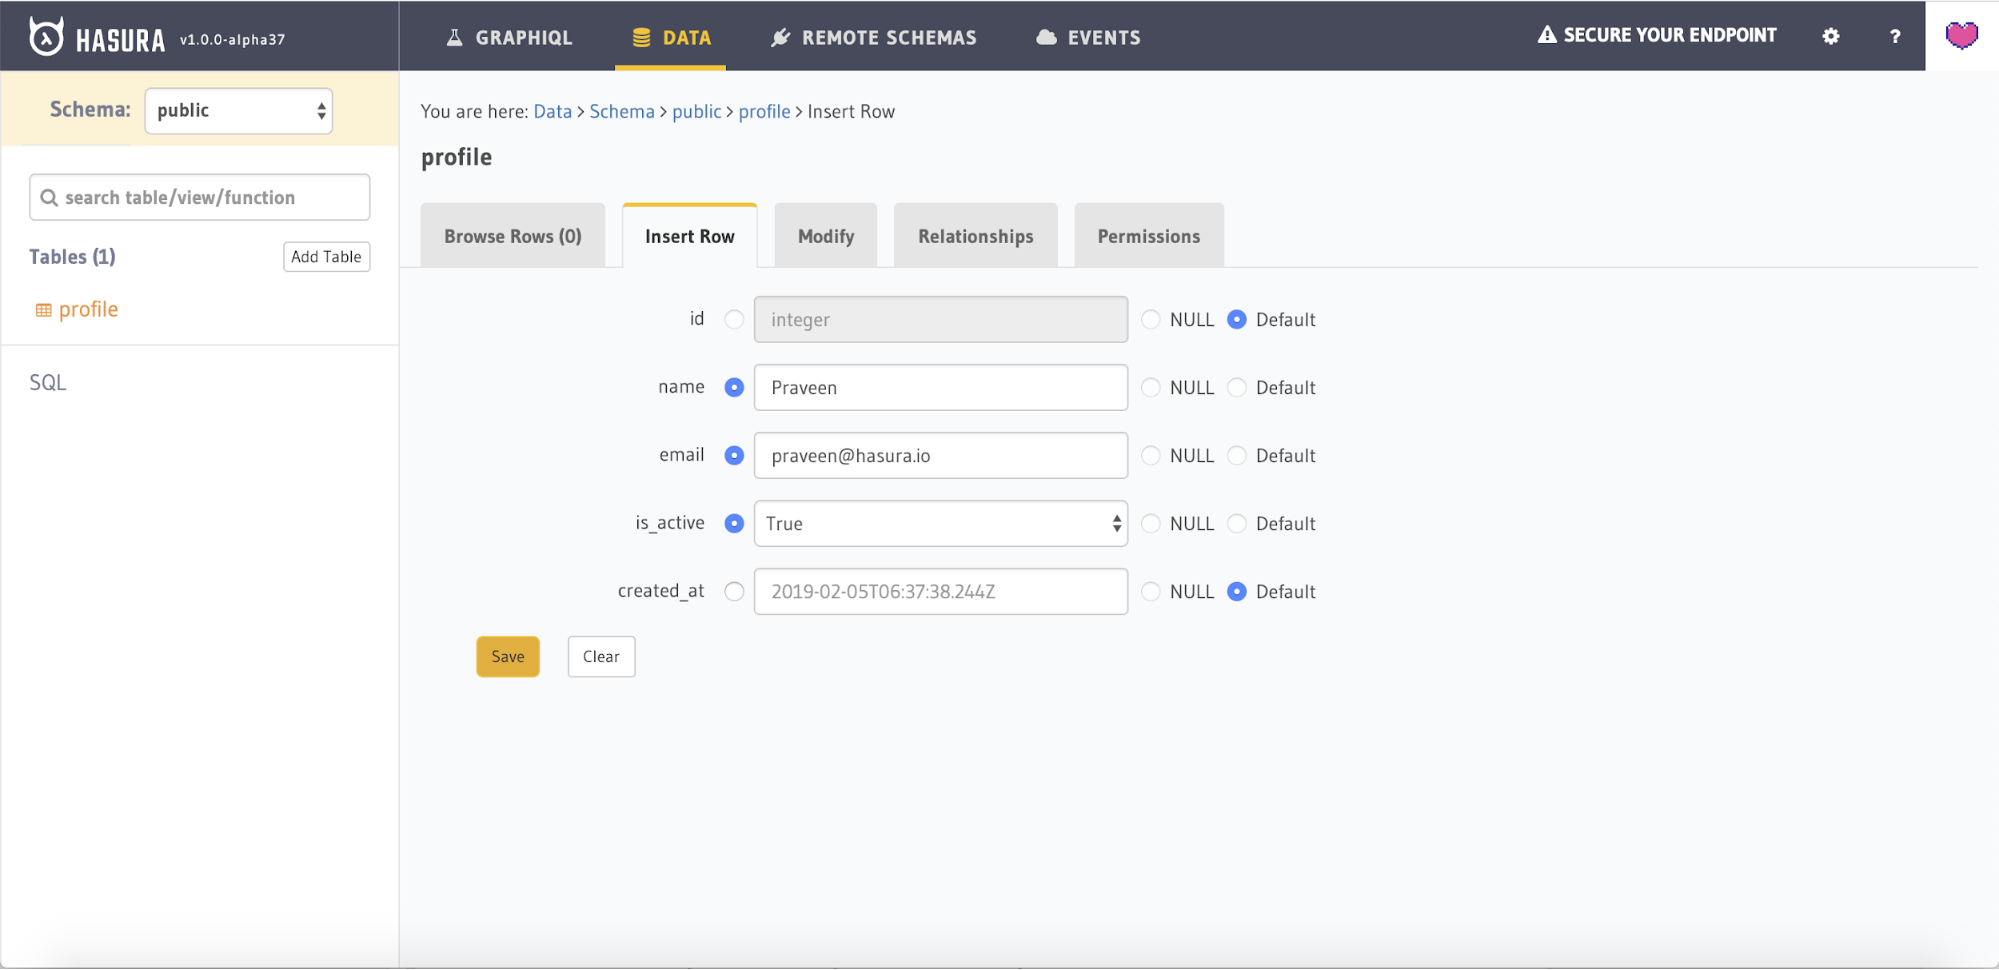
4. Now insert some sample data into the table by going to the Insert Tab.
5. Let’s query the data we have inserted by making a GraphQL Query. Head to GraphiQL tab and enter the following query and click on Play.
query {
  profile {
    id
    name
 }
}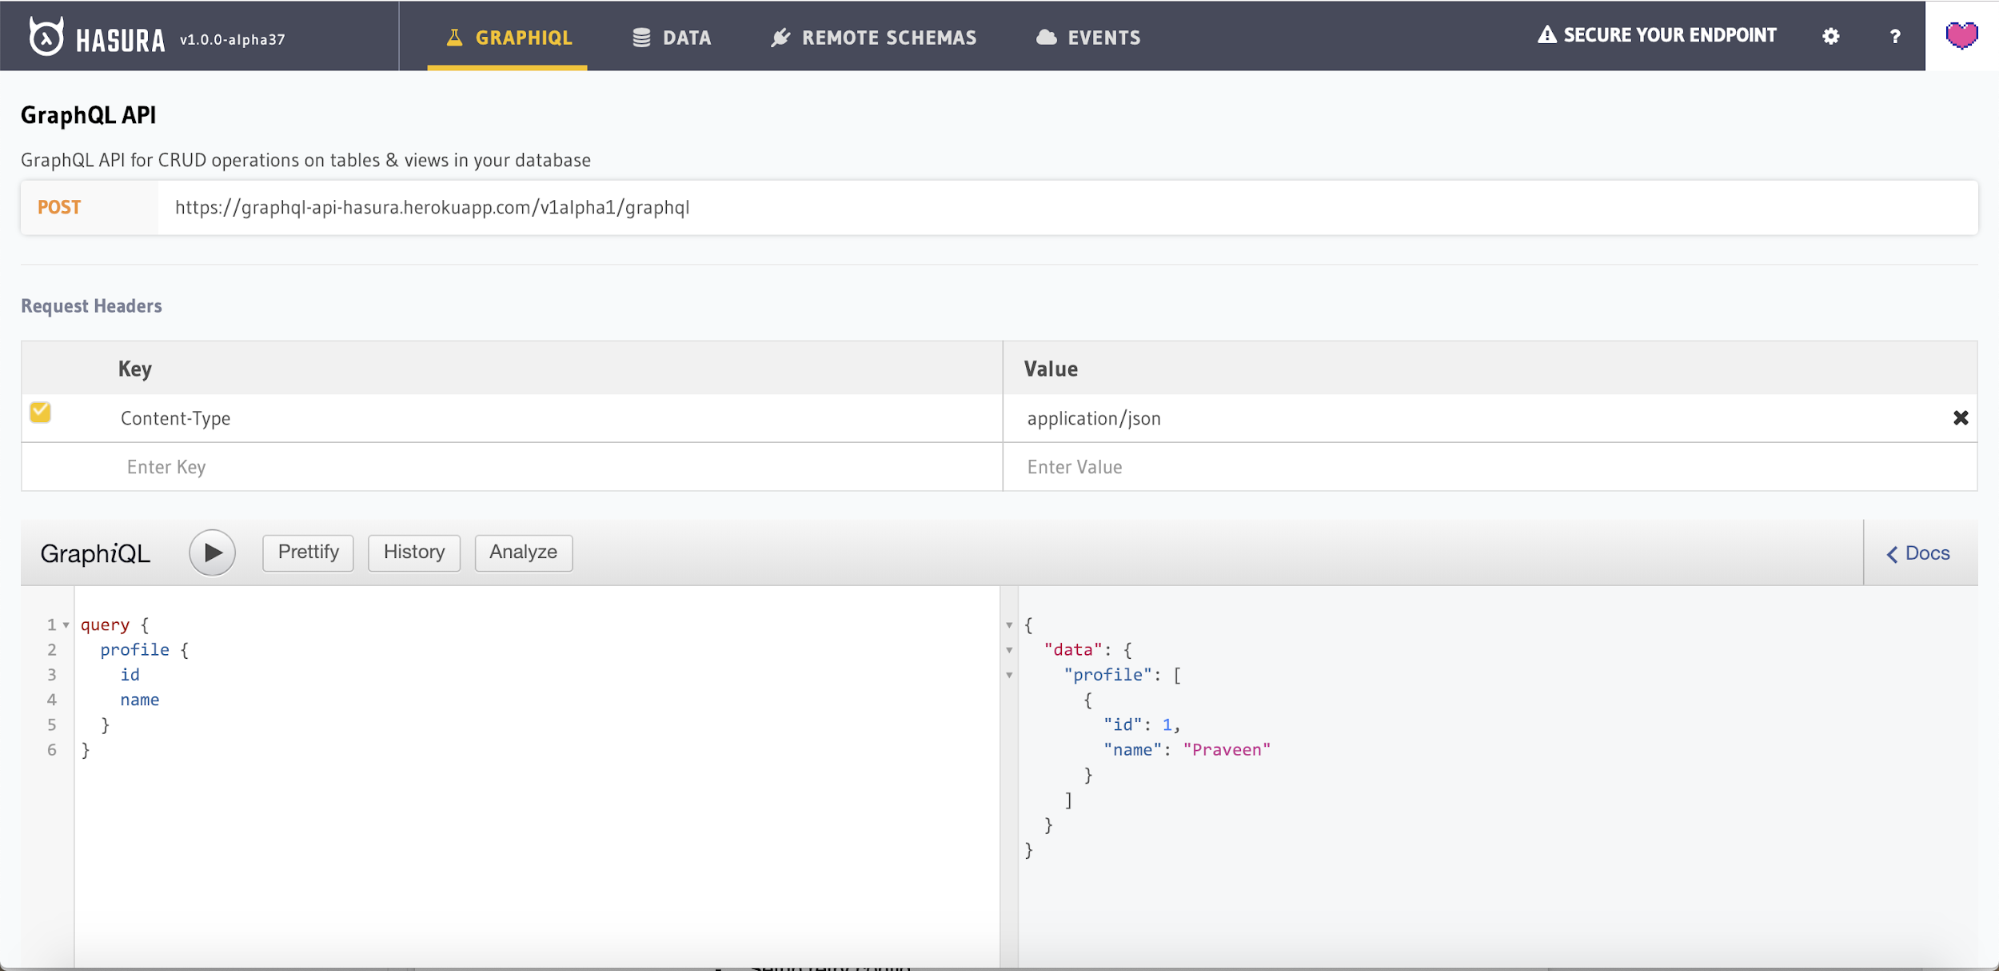
Notice how easy it was to get an API that your client can consume. Similarly, you can make a mutation query to perform insert/update/delete. This means that you do not need to write any code to get CRUD APIs for your client app. All of it has been generated by Hasura.
You can also configure permission rules for your users, at both row level and column level. Read more about access control with examples here. Authorization works with setting up webhooks or with JWT and hence it is not tied down to any Auth provider. For brevity of this post, we are skipping Auth.
Extend Hasura with Remote Schemas
As you learned above, Hasura gives you instant GraphQL APIs over Postgres. But now your app will have custom logic that cannot be implemented via CRUD APIs. A common use case would be to make payments, doing some data processing etc. You can easily extend Hasura by adding your custom logic as Remote Schemas.
For this example, we are going to extend the above Hasura GraphQL API with a custom weather API which can be queried upon by the client. Clone the source for the weather API from here.
Deploy GraphQL API on Zeit
Once you have cloned the above repo, you can deploy to Zeit Serverless using the following command. Navigate to remote-schema folder and execute the following command.
$ nowThis will give a GraphQL Endpoint for the custom weather API. Again notice how easy it is to deploy your custom logic to a serverless backend. Now let’s test the API by adding it as a Remote Schema to Hasura, so that the client can query both using the same endpoint.
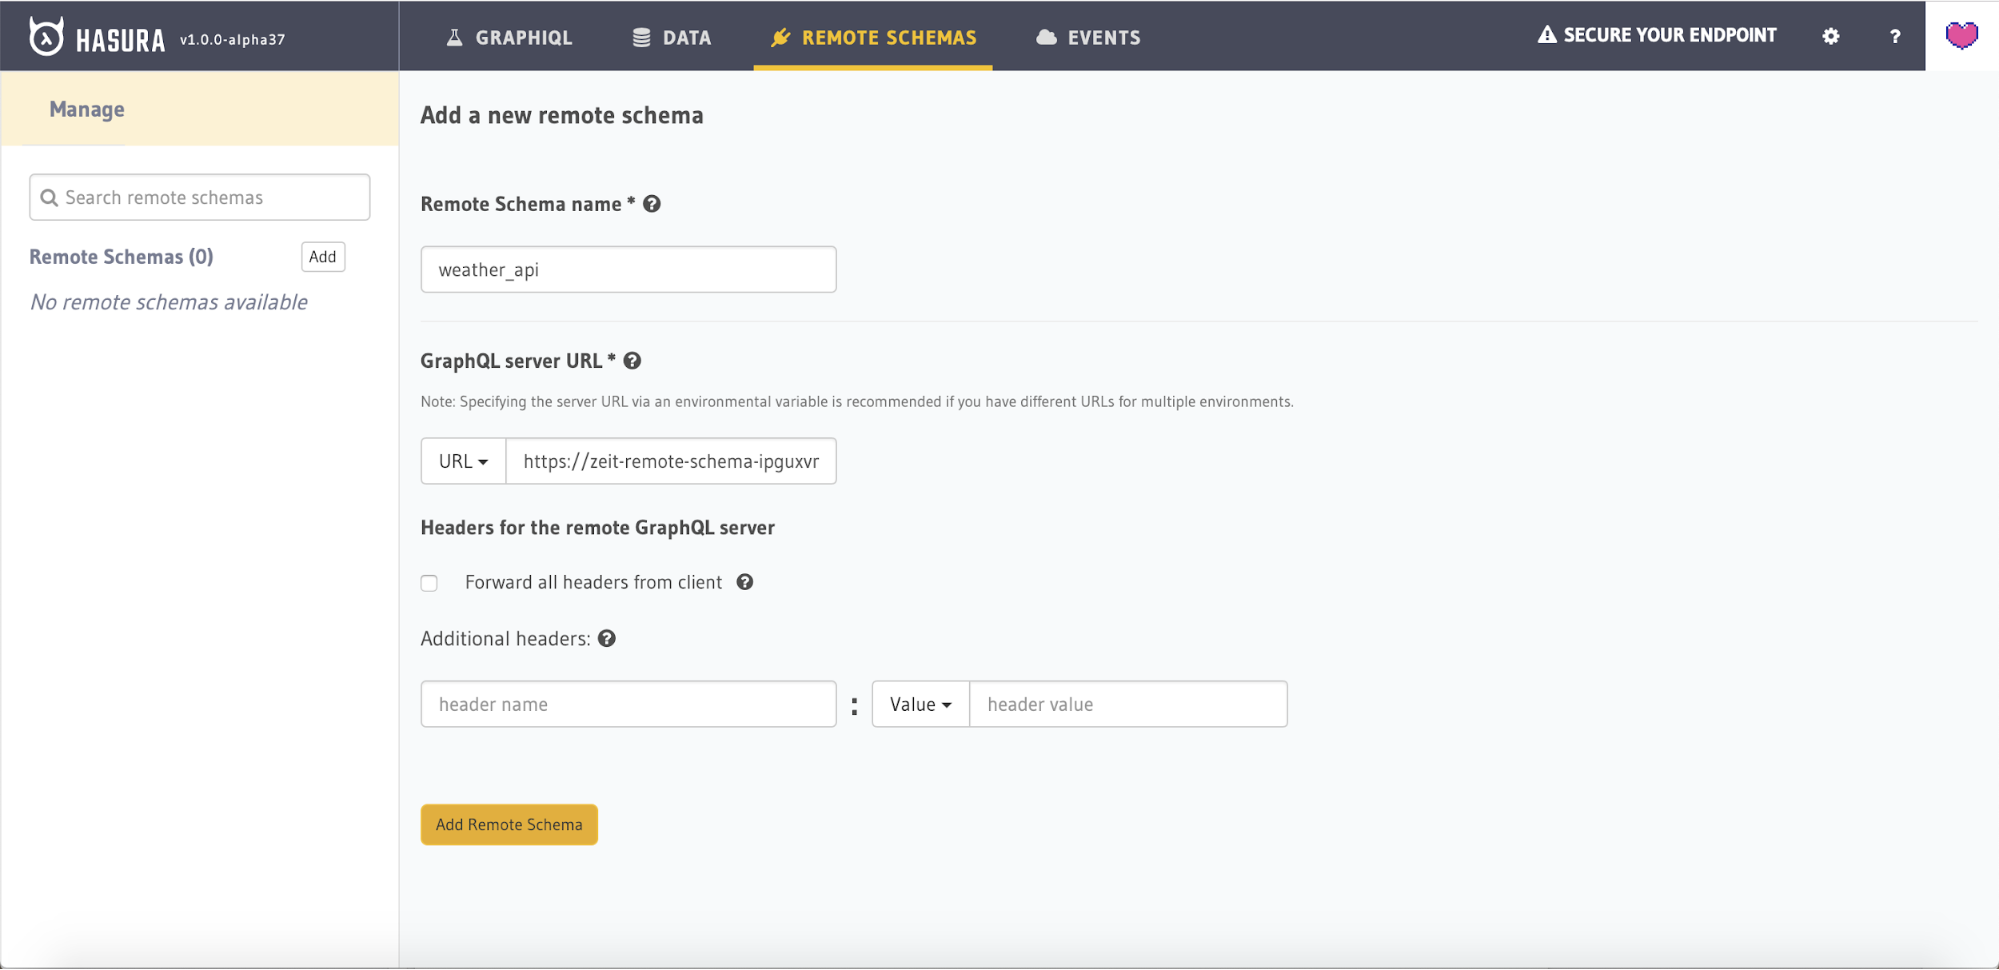
Create Remote Schema on Hasura Console
Head to Remote Schemas tab on the Hasura console and add the weather API. The GraphQL server URL will be the now.sh deployment URL, that we just did above.
Now, let’s make a query in GraphiQL to see if all the APIs have been merged.
query {
  cityWeather(city_name:"Bangalore") {
    max_temp
    min_temp
    applicable_date
  }
}
Query GraphQL schema deployed on Zeit
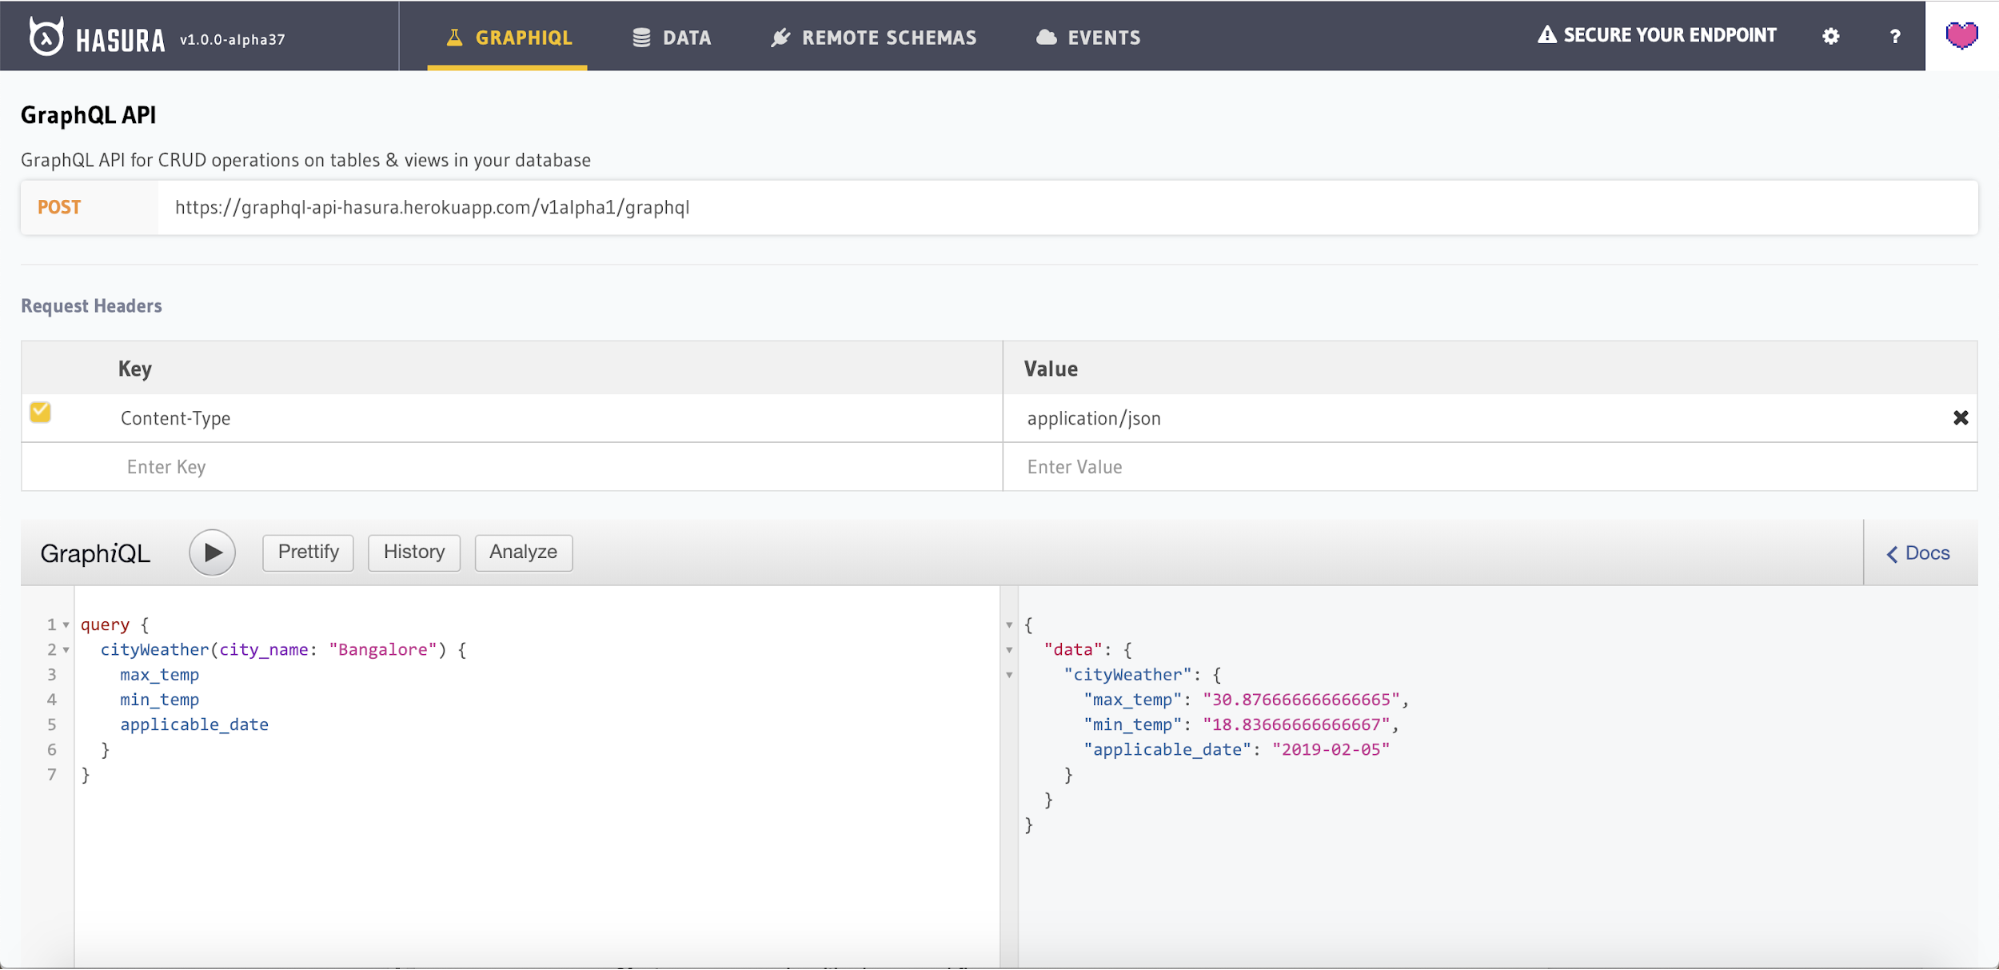
The above is an example to fetch weather information for a given city name. (Bangalore in this case). This way, you can effectively write custom business logic in any language and deploy it as a GraphQL API to be added as a Remote Schema. You can deploy as many custom logic backends on Now 2.0 and extend Hasura with it.
Trigger async events
There are parts of your application which can be asynchronous. A simple use case would be to send an email to a user who has just signed up or send an email to a customer after order placement in an e-commerce flow or do custom validations or data manipulations and scheduled jobs.
Hasura can be used to create event triggers on tables in the Postgres database. Event triggers reliably capture events happening on the specified tables and then call configured webhooks to carry out some business logic.
This business logic is recommended to be written in serverless backends, because they scale from the beginning, easy to deploy with less maintenance. Let’s now deploy the custom logic written in Node.js to trigger based on an insert on profile table.
Deploy functions on Zeit
Clone the Node.js function from here, which reverses the name of the profile.
This function will be triggered on insert into profile table. Whenever a new row is inserted into profile table, we will capture that event and reverse the name of the profile.
Deploy this function to Zeit using the following command:
$ now -e HGE_ENDPOINT='https://myapp.herokuapp.com/v1/graphql'Replace it with your Hasura GraphQL endpoint.
You have now deployed your serverless function on Zeit.
Create event trigger on Hasura Console
Let’s add the serverless function to the Hasura console as follows:

Enter the trigger name, select the profile table and operations (insert) and finally enter the webhook URL as the now.sh URL that was deployed in the above step.
Setup retry config
To handle errors or external dependency downtimes, you can setup retry config to a specific interval under Advanced Settings.
Now let’s insert a user into the table and see if this function is being triggered. Go to Insert row tab and insert a new row. Head over to Events tab and look at the Processed Events.
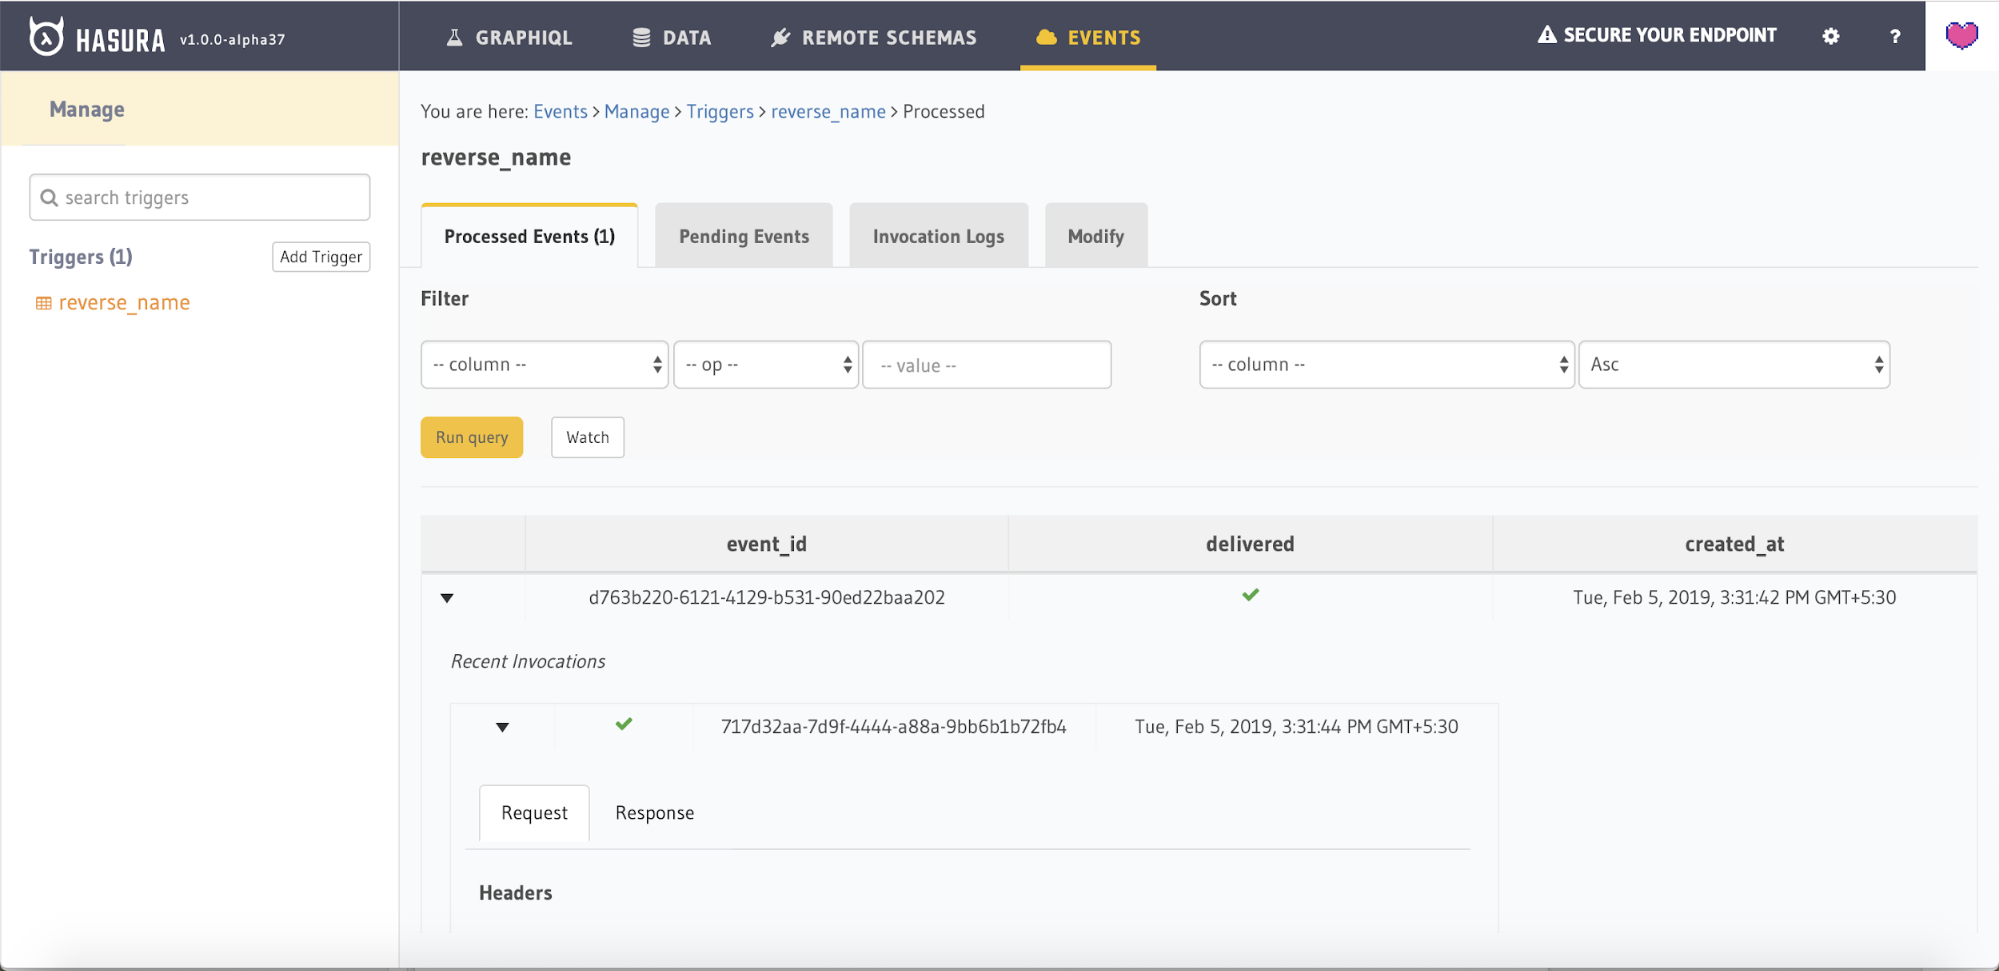
You will find that there is a new event that was triggered on insert into profile.
The name of the user inserted has been reversed. You can verify this by making a query to the profile table or by visiting the Browse tab.
The above workflow completes the 3rd factor of a 3factor.app - Async serverless.
Now 2.0 helps in deploying the serverless functions and custom GraphQL APIs easily. Since these functions are deployed in a serverless environment, it can be scaled on the go.